
The Two-Tone Garter Stripe Scarf
A free beginner knitting pattern from Hook, Needle & Hoop
If you can cast on, knit, and bind off, you can make this scarf. Every single row is a knit row. The only new thing is changing colors, and we'll walk you through that step by step. The wide stripes in warm terracotta and mustard make a plain garter scarf feel a little special, and they do something handy too: each stripe is a built-in progress marker. Finish a stripe, and you know you're about 4" further along.
We change colors in a way that lets you carry the yarn up the side instead of cutting it. That means only four ends to weave in for the whole scarf.
A quick note on terms: This pattern uses US knitting terms. Where the UK word is different, you'll see it in brackets, like this: bind off [UK: cast off].
At a glance
| Skill level | Beginner |
| Finished size | about 6" wide x 60" long (15 x 152 cm) |
| Yarn | Worsted weight (#4) in 2 colors [UK: between DK and aran; look for a label that suggests 5 mm needles] |
| Needles | US 8 (5.0 mm) [UK: 5 mm] straight needles |
| Stitches used | cast-on (long-tail or knitted), knit, bind off [UK: cast off] |
Materials
- Color A: terracotta worsted weight (#4) yarn, about 211–250 yd (193–229 m). This is an estimate. We recommend buying 2 skeins (200–220 yd / 183–201 m each).
- Color B: mustard worsted weight (#4) yarn, about 185–218 yd (169–199 m). This is an estimate. We recommend buying 2 skeins (200–220 yd / 183–201 m each).
- Needles: one pair of US 8 (5.0 mm) [UK: 5 mm] straight needles, about 10" (25 cm) long.
- Yarn needle (tapestry needle), for weaving in ends.
- Scissors.
- One removable stitch marker (or a safety pin or a scrap of yarn), to mark the right side.
Yardage is estimated for a scarf knit at the gauge below. A soft wool or wool-blend is lovely here, but any smooth worsted yarn works. Check the yardage on the label. Most worsted skeins hold about 200–220 yd, and each color may need a little more than one skein, so buy 2 skeins of each color. Any leftover makes a great matching hat or a second scarf for a friend.
Gauge [UK: tension]
18 stitches and 36 rows (18 garter ridges) = 4" (10 cm) in garter stitch.
Gauge isn't critical for a scarf. If yours is a bit wider or narrower, it'll still be a great scarf. Just know that knitting more loosely makes the scarf wider and uses more yarn, so keep an eye on your yarn.
The easy way to check: knit the first stripe (18 ridges), then lay it flat and measure. It should be about 6" (15 cm) wide and 4" (10 cm) tall.
Finished size
About 6" wide x 60" long (15 x 152 cm). Garter stitch is squishy and stretchy, so it may relax a little longer as you wear it.
Abbreviations
| Abbreviation | US term | UK term |
|---|---|---|
| st(s) | stitch(es) | stitch(es) |
| RS | right side (the side with the marker) | right side |
| WS | wrong side | wrong side |
| A | Color A, terracotta | Colour A |
| B | Color B, mustard | Colour B |
| CO | cast on | cast on |
| ridge | one raised bump line in garter stitch = 2 knit rows | ridge |
How the stripes work
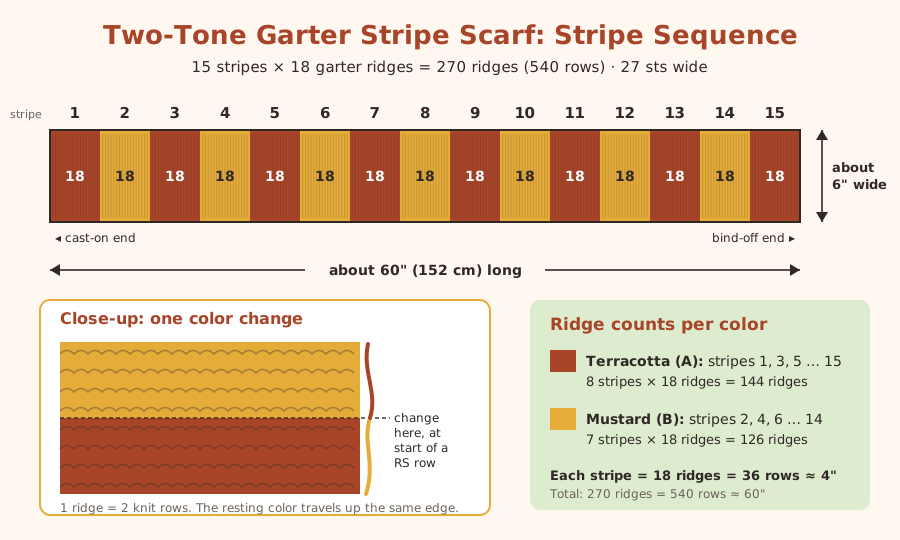
- Garter stitch means you knit every row. Every 2 rows make 1 ridge (one bumpy line you can count).
- Each stripe is 18 ridges (36 rows), which is about 4" (10 cm).
- There are 15 stripes: 8 in terracotta (A) and 7 in mustard (B). The scarf starts and ends with terracotta.
- You always change color at the start of a RS row. Because each stripe has an even number of rows, both yarns end up at the same edge every time, ready to be picked up again.
Instructions
Every row has 27 stitches.
Cast on and Stripe 1
- Cast on: With A (terracotta), CO 27 sts. We like the long-tail cast-on here because it makes a neat, stretchy edge, but the knitted cast-on from our guide works fine too. Leave a 6" (15 cm) tail. [27 sts]
- Row 1 (RS): Knit across. [27 sts] Clip your removable marker onto this side of the fabric, near the edge where the tail hangs. This is the right side.
- Row 2 (WS): Knit across. [27 sts] You've made your first ridge.
- Rows 3–36: Knit every row. [27 sts in every row] You now have 18 ridges in terracotta. Finish with a WS row, so the RS (marker side) is facing you for the next row.
Stripe 2: your first color change
- Row 37 (RS): Leave A hanging; don't cut it. Pick up B (mustard), leaving a 6" (15 cm) tail. Hold the tail against the back of the work and knit the first 2–3 stitches with B, then let go of the tail and knit across. [27 sts]
- Row 38 (WS): Knit across with B. [27 sts]
- Rows 39–72: Knit every row with B. [27 sts in every row] You now have 18 ridges in mustard.
Just after a color change: the first row of mustard is on the needle, and the working strand runs back to the mustard ball. The terracotta you're not using hangs down below the fabric at the edge. Don't cut it; it waits there until the next stripe.
Stripes 3 to 15
- Keep alternating colors, changing at the start of a RS row every 36 rows. For each new stripe: drop the old color (don't cut it), pick up the other color from where it's waiting at the edge, and knit 36 rows (18 ridges). [27 sts in every row] Bring the new color up from under the old one, and don't pull the carried strand tight; it should lie flat along the edge, as long as the stripe it skipped.
Use this table to keep your place. Tick off each stripe as you go.
| Stripe | Color | Rows | Ridges in stripe | Total ridges | About how long so far |
|---|---|---|---|---|---|
| 1 | A, terracotta | 1–36 | 18 | 18 | 4" (10 cm) |
| 2 | B, mustard | 37–72 | 18 | 36 | 8" (20 cm) |
| 3 | A, terracotta | 73–108 | 18 | 54 | 12" (30 cm) |
| 4 | B, mustard | 109–144 | 18 | 72 | 16" (41 cm) |
| 5 | A, terracotta | 145–180 | 18 | 90 | 20" (51 cm) |
| 6 | B, mustard | 181–216 | 18 | 108 | 24" (61 cm) |
| 7 | A, terracotta | 217–252 | 18 | 126 | 28" (71 cm) |
| 8 | B, mustard | 253–288 | 18 | 144 | 32" (81 cm) |
| 9 | A, terracotta | 289–324 | 18 | 162 | 36" (91 cm) |
| 10 | B, mustard | 325–360 | 18 | 180 | 40" (102 cm) |
| 11 | A, terracotta | 361–396 | 18 | 198 | 44" (112 cm) |
| 12 | B, mustard | 397–432 | 18 | 216 | 48" (122 cm) |
| 13 | A, terracotta | 433–468 | 18 | 234 | 52" (132 cm) |
| 14 | B, mustard | 469–504 | 18 | 252 | 56" (142 cm) |
| 15 | A, terracotta | 505–540 | 18 | 270 | 60" (152 cm) |
- After Row 504 (the end of Stripe 14), cut B, leaving a 6" (15 cm) tail. You won't need mustard again.
- Rows 505–540 (Stripe 15): Knit every row with A. [27 sts in every row]
Bind off
- Row 541 (RS), bind off [UK: cast off]: With A, knit 2 sts. *Lift the first stitch on the right needle over the second and off the needle. Knit 1 more st; rep from * until 1 st remains. [1 st] Cut the yarn, leaving a 6" (15 cm) tail, and pull it through the last stitch to close it. [0 sts]
Bind off loosely, so the end of the scarf stretches as much as the rest of it. If your bind-off edge looks tighter than the cast-on edge, try binding off with a needle one size bigger (US 9 / 5.5 mm).
Tips
- Count ridges, not rows. Ridges are much easier to see. Each stripe is 18 ridges. Count them on the RS (the marker side).
- Change colors with the marker side facing you. If you always change at the start of a RS row, the little two-color "blips" all land on the WS (the back), and the stripes look neat and crisp on the front.
- Keep the carried yarn snug, not tight. Because our stripes are wide, the waiting yarn travels a long way (36 rows). To keep it tidy, twist the two yarns together at the start of every 4th row (every second RS row): before you knit the first stitch, lay the waiting yarn over the working yarn, then knit as usual. This tucks it against the edge so it doesn't make a big loop.
- Check your count now and then. Every few stripes, count your stitches. You're looking for 27.
- Stop at the end of a row. If you put your knitting down mid-row, it's easy to lose your place.
- Keep the yarn from tangling. Set one ball on your left and one on your right. When you change colors, always bring the new yarn up from under the old one. If the yarns twist up anyway, let the scarf hang and spin, and they'll untwist.
Common fixes
- My stitch count is 28 (or more). The most common cause: at the start of a row, the yarn went over the needle and pulled the first stitch into two loops. Before you knit the first stitch, keep the working yarn hanging straight down behind the needle (at the back of the work), below the first stitch. If you've gained a stitch, knit the two loops together as one.
- My stitch count is 26 (or fewer). A stitch probably slid off. Look down the column for a little ladder. Catch the loose loop with a crochet hook or spare needle and work it back up, or carefully rip back to the row where it dropped.
- There's a big loop of yarn at the edge. The carried yarn got pulled loose or skipped its twists. Gently ease the extra yarn back toward the ball, a few stitches at a time, from the bottom of the loop up.
- The edge is puckering. The carried strand was pulled too tight. Loosen it by tugging the fabric lengthwise. Next time, let the strand relax before you twist it in.
- My scarf is getting wider (or narrower). Count your stitches. Gaining or losing stitches usually happens at the edges, so take a close look there.
- I changed color on the wrong side. No big deal. Garter stitch looks almost the same on both sides. If it bothers you, rip back to the color change and redo it on the RS.
- My stripes aren't the same height. Re-count ridges at the end of each stripe before changing colors. One ridge more or less won't show much, but keeping them even looks nicest.
Finishing
- Weave in ends. You'll have 4 tails: one at the cast on (A), one at the start of Stripe 2 (B), one at the end of Stripe 14 (B), and one at the bind off (A). Thread each onto your yarn needle and weave it into a stripe of the same color, either along the side edge or through the bumps of the ridges on the WS, for about 2" (5 cm). Then weave back the other way for about 1" (2.5 cm). Trim close to the fabric.
- Light blocking. Lay the scarf flat on a towel and mist it lightly with water (or follow the care instructions on the yarn label). Gently pat it out to about 6" x 60" (15 x 152 cm), keeping the edges straight, and leave it until it's completely dry. Don't stretch it hard: garter stitch looks best with its ridges a little squishy.
- Care. Follow the yarn label. Many wool yarns need hand washing and drying flat.
Wrap it on, and enjoy it. You knit a whole striped scarf!
© Hook, Needle & Hoop. This is an original pattern, made with simple, traditional techniques.