
How to Start Embroidery: hoop, floss and a few stitches
A step-by-step guide for people who have never threaded an embroidery needle.
Embroidery is drawing with thread. You stretch fabric in a hoop, draw a design on it and stitch along the lines with a sharp needle and cotton floss. The supplies are small and cheap, and six stitches are enough to make a real first piece.
This guide covers what to buy, how to get fabric drum-tight in a hoop, how to split floss into strands, how to start and end a thread neatly, and six stitches in the order most beginners find easiest. Then you'll put all six into a small practice sampler. First stitches are often uneven. That's normal, and it's what the sampler is for.
Every step and diagram in this guide is checked against published references from DMC and the Royal School of Needlework (RSN), with extra tips from Needle 'n Thread, Sublime Stitching and John James, before it goes live.
About the pictures: The sampler illustration and step diagrams in this guide are our own, drawn for this site. The step diagrams are checked against DMC's published stitch diagrams and the RSN's stitch instructions. The videos are by other teachers. Where their method differs from the steps here, we say so. Trust the written steps for the details.
A quick note on terms: This guide uses US terms. Where the UK word is different, it's in brackets, like this: embroidery floss [UK: stranded cotton]. Most stitch names are the same in both.
Part 1: What to Buy
The supplies
- An embroidery hoop, 6 in (15 cm). A wooden hoop with a screw is a good choice. DMC sells them in 5 in (12 cm), 6 in (15 cm), 7 in (18 cm) and 10 in (25 cm). The sampler in Part 5 is laid out for a 6 in hoop.
- Plain, woven cotton or linen in a medium weight, white or a light color. Quilting cotton works and is easy to find. You need about a 10 in (25 cm) square for a 6 in hoop, so there's at least 2 in (5 cm) spare all the way round. Skip stretchy fabric, like T-shirt knit, for now: it puckers.
- Embroidery floss [UK: stranded cotton], 6-strand cotton, in 2 to 5 colors. A skein of DMC floss is 8.7 yd (8 m) of 100% cotton, and its six strands pull apart. You'll stitch with 2 or 3 strands at a time.
- Embroidery needles (also called crewel needles), a mixed pack in sizes 5–10 or 3–9. They have a sharp point and a longer eye, so several strands fit through. The higher the number, the finer the needle. John James says size 7 is the most popular.
- Small, sharp scissors.
- Something to mark the fabric: a water-soluble fabric pen, or a sharp HB pencil. Part 2 explains both.
- Optional: a strip of cotton bias tape [UK: bias binding] to wrap the inner ring of the hoop, which helps it grip.
What it costs
DMC's own US shop lists six-strand floss from $1.15 a skein, embroidery needle packs from $1.70 and its water-soluble transfer pen at $5.99 (prices checked on October 20, 2026). Hoop and fabric prices vary a lot by store, so we haven't listed them.
Words you'll see
- Floss [UK: stranded cotton]: the thread. One length is made of 6 thin strands twisted loosely together.
- Skein: one bundle of floss as you buy it.
- Strand: one of the six threads in floss. Patterns say "2 strands" to mean you stitch with 2 of the 6.
- Hoop: two wooden rings that hold the fabric tight. The inner ring is solid; the outer ring has the screw.
- Transfer: getting the design onto the fabric.
Part 2: Getting Set Up
1. Prepare the fabric
DMC suggests washing and ironing the fabric before you start, so it won't shrink later. Stop the cut edges from fraying with pinking shears, a zigzag on a sewing machine, or low-tack tape.
2. Transfer the design
You need the lines on the fabric before it goes in the hoop. There are three common ways to do it, and they're often combined.
- Light box or window, plus pencil or pen. Tape the printed design to a sunny window or a light box, tape the fabric over it and trace the lines you can see through it. Needle 'n Thread's author traces with a light box and a mechanical HB pencil. Draw thin, light lines that your stitches will cover.
- Water-soluble pen. The lines disappear when you rinse the fabric in water. Test it on a scrap of the same fabric first: Needle 'n Thread notes that chemical marking pens can leave residue or come back on some fabrics.
- Heat-erasable pens. These vanish with the heat of an iron, which looks handy. But the ink can reappear in the cold, and it can leave a faint ghost line, sometimes yellowish brown, even after washing. We don't suggest them for a first piece.
Iron-on transfer ink is different again: Sublime Stitching says the ink from its iron-on patterns doesn't wash out, so stitches have to cover every line.
3. Put the fabric in the hoop, drum-tight
Loose fabric is the main cause of puckered, wobbly stitches, so this step matters more than it looks.
- Loosen the screw and take the rings apart.
- Lay the inner ring (no screw) on a table. Put the fabric over it, design side up and centered.
- Press the outer ring down over the fabric and the inner ring.
- Tighten the screw a little.
- Gently pull the fabric edges all the way around the hoop until it's taut, keeping the design lines straight. Tighten the screw a bit more each time.
- Tap the fabric. DMC says it should sound like a drum.
The fabric slackens as you work, so tighten it again from time to time. When you stop for the day, take the fabric out of the hoop. DMC warns that leaving it in for long leaves creases.
4. Cut and separate the floss
- Pull no more than 18 in (45 cm) of floss from the skein and cut it. DMC gives this as the maximum; longer pieces get worn and frayed from being pulled through the fabric so many times.
- Tap the cut end so the strands spread apart.
- Pinch the end and pull out one strand slowly, straight up. The rest of the bunch will scrunch up, then fall loose.
- Pull out a second strand the same way. Even when you need 2 or 3 strands, take them out one at a time and lay them back together side by side.
Use 2 strands for everything in this guide. That gives a fine, clear line. 3 strands make a bolder line; 1 strand is very fine.
5. Thread the needle
Cut the end of the strands at an angle, then push them through the eye. Start with a size 7. John James calls it the most popular embroidery needle size, and DMC lists its size 7 for 1 to 4 strands of floss. If the strands won't go through the eye, or the needle is hard to pull through the fabric, try a larger needle (a lower number).
How to hold the needle
Work with the needle going straight up and down through the fabric: up in one move, down in the next. DMC calls this stabbing. It keeps the tension even. Stitches pulled too tight pucker the fabric; stitches left too loose look limp.
Part 3: Starting and Ending a Thread
Starting: with a knot, or without one
You'll see both, and both are used by experienced stitchers.
A small knot on the back is the simplest start. Needle 'n Thread says some stitchers use one, and that's fine as long as the knot isn't big enough to show as a bump on the front. The downsides: DMC says knots make bumps, which is why it doesn't generally recommend them, and the teacher in the video below points out that a knot can work loose. DMC does suggest a small knot for things that are worn or washed a lot.
A waste knot gives a flat, neat start with no knot left behind:
- Tie a knot in the end of the floss.
- From the front, put the needle down on your design line about 1 in (2.5 cm) ahead of where you'll start, so the knot sits on top.
- Come up at your starting point and make two tiny stitches on the line. Your stitching will cover them.
- Stitch along the line toward the knot. On the back, your stitches cover the thread that runs to the knot.
- When you get close, pull the knot up gently and snip it off close to the fabric.
An away knot works the same way, but the knot goes about 4 in (10 cm) away from the stitching, in a spot you won't stitch. When you're done, snip the knot off, thread the loose tail onto the needle and weave it under the stitches on the back.
Ending a thread
When the thread gets short, while there's still enough to thread through a few stitches, take the needle to the back. Slide it under the backs of the last few stitches, then snip the thread close. The other way: make two tiny stitches on the front in a spot your stitching will cover, and snip.
Keeping the back tidy
The back doesn't need to look like the front, but it shouldn't be a tangle. A few habits help:
- Don't carry the thread across bare fabric in a long, loose stitch on the back. If the next line is only a couple of inches away, run the needle under the backs of your stitches to get there. If it's farther, end the thread and start again.
- Snip ends short once they're secure, so they don't get caught in new stitches.
- Weave ends under stitches of the same color where you can.
Watch it step by step. This video shows a waste-knot start, two tiny holding stitches, and both ways to end a thread (weaving under the back, or tiny stitches you cover):
Part 4: Six Stitches in Learning Order
These six stitches build on each other. Running stitch teaches you to come up and go down neatly. Backstitch, split stitch and stem stitch are the three outline stitches Sublime Stitching suggests beginners learn first. Lazy daisy and French knots add petals and dots.
Every diagram shows the front of the fabric. A green circle is where the needle comes up from the back; a dark circle is where it goes down. Practice each stitch on a spare line before you start the sampler.
This video covers four of the six (backstitch, stem stitch, detached chain and French knot). We point out the right part in each section below:
1. Running stitch
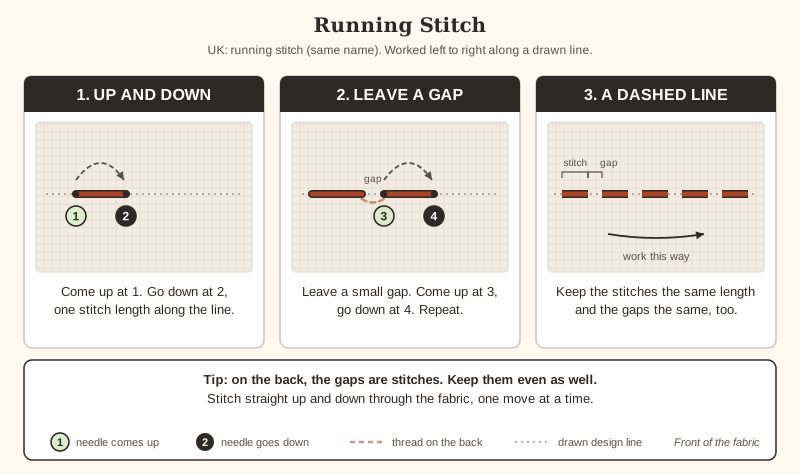
The simplest stitch, and the first one many people learn. It makes a dashed line.
- Come up at 1, at the start of the line.
- Go down at 2, one stitch length along.
- Leave a small gap and come up at 3. Go down at 4.
- Repeat. Keep the stitches the same length and the gaps the same, too. On the back, the gaps are stitches, so they should be even as well.
2. Backstitch [UK: back stitch]
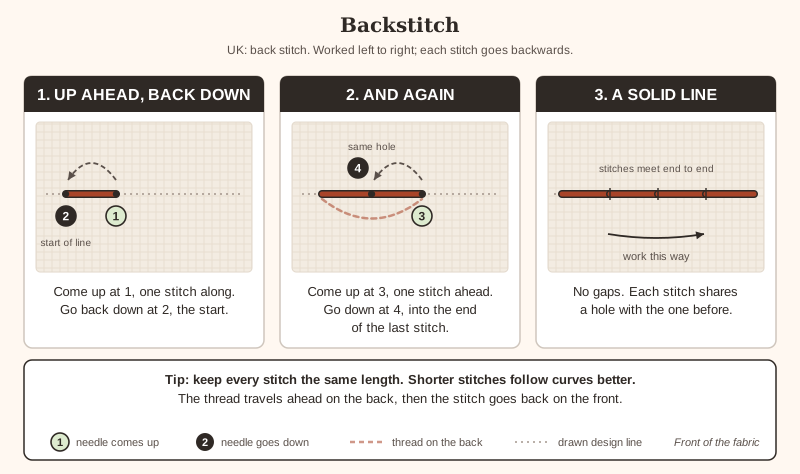
A solid line, good for lettering and outlines. Each stitch goes backwards to meet the one before.
- Come up at 1, one stitch length along the line from the start.
- Go back down at 2, the start of the line.
- Come up at 3, one stitch length ahead of 1.
- Go back down at 4, into the same hole as 1.
- Repeat: up one stitch ahead, down into the end of the last stitch.
Keep the stitches the same length. On curves, make them shorter.
In the five-stitch video, backstitch starts at 0:26. She works left to right, like our diagram.
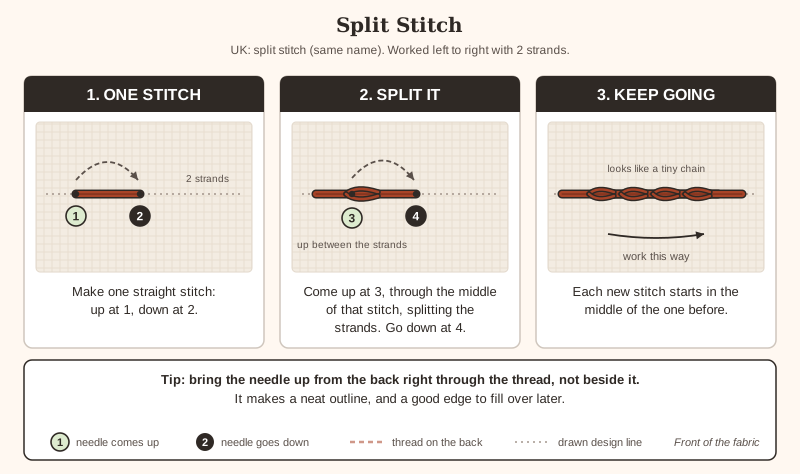
3. Split stitch
A neat outline that looks like a tiny chain. It's also a good edge to fill over later with satin stitch. Use 2 strands.
- Make one straight stitch: up at 1, down at 2.
- Come up at 3, through the middle of that stitch, so the needle splits the two strands.
- Go down at 4, one stitch length ahead.
- Repeat, always coming up through the middle of the last stitch.
4. Stem stitch
A smooth, slightly twisted line, often used for stems and curves. The trick is keeping the thread on the same side every time. Our diagram works left to right with the thread below the line.
- Come up at 1. Go down at 2, one stitch length along, and leave a loose loop below the line.
- Come up at 3, halfway between 1 and 2, just above the stitch, with the loop still below.
- Pull the loop snug.
- Go down at 4, one stitch length from 3 (half a stitch past 2). Come up at 5, in the end hole of the last stitch, just above it. Keep the thread below.
- Repeat.
Keep the stitches short: Needle 'n Thread suggests about 1/4 in (6 mm) on small circles, and shorter on tight curves. If you keep the thread above the line instead of below, you get outline stitch, which looks slightly different. Either is fine; just don't switch partway.
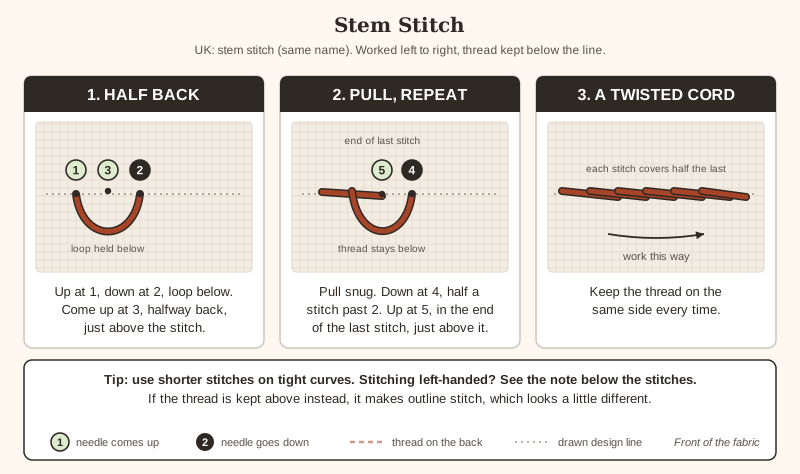
In the five-stitch video, stem stitch starts at 2:27. She works left to right with the loop toward her, which matches our diagram.
5. Lazy daisy (detached chain)
One loop held down by a tiny stitch. A ring of them makes a flower. It's also called detached chain or single chain.
- Come up at 1, at the base of the petal (the end nearest the flower's center).
- Go back down at 2, in or right next to the same hole. Pull gently until a small loop is left on top. Hold the loop with your thumb so it doesn't pull through.
- Come up at 3, inside the loop, where the tip of the petal will be.
- Pull the thread gently so the loop lies flat. Don't pull too hard, or the petal loses its rounded shape.
- Go down at 4, just over the loop, to make a tiny stitch that holds it in place.
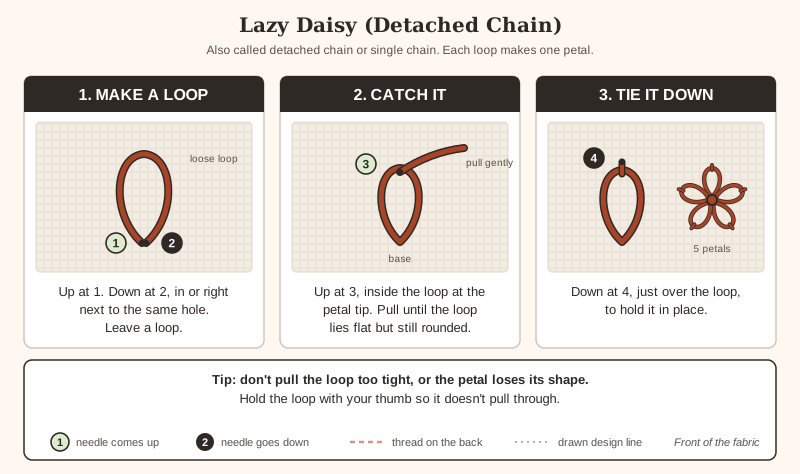
In the five-stitch video, detached chains are at about 9:07 to 10:59, after the full chain stitch. She also shows one pulled too tight so you can see what goes wrong.
6. French knot
A small raised dot. French knots have a reputation for being fiddly, but most problems come down to two things: keeping the thread taut, and not going back down the same hole.
- Come up at 1, where you want the knot.
- Hold the thread taut with your other hand and wrap it around the needle twice, close to the fabric.
- Still holding the thread taut, put the needle tip in at 2, very close to 1 but not in the same hole.
- Slide the wraps down the needle so they sit against the fabric.
- Keep holding the thread as you pull the needle slowly through to the back.
DMC and the RSN both say one or two wraps. For a bigger knot, Needle 'n Thread suggests more strands (3 or 4 instead of 2) rather than more wraps, and never more than three wraps, because the knot gets loose and uneven.
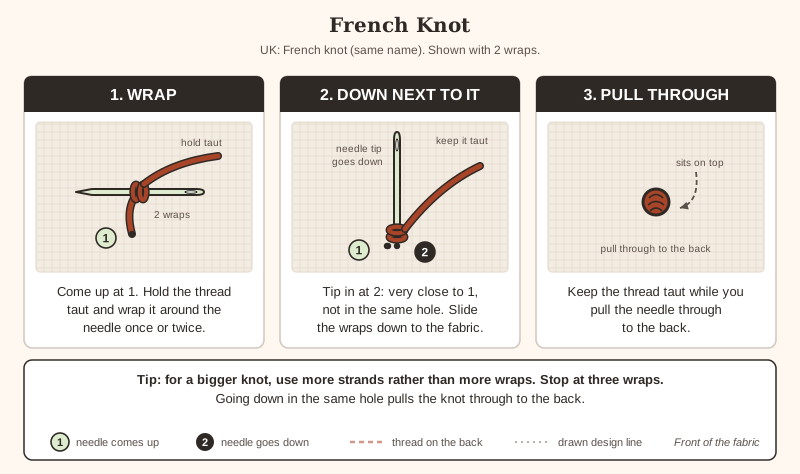
Watch it step by step. This short DMC clip shows the wrap, the needle going down next to the first hole, and the pull-through:
The five-stitch video also covers the French knot, at 11:02. She uses one wrap, and she lets go of the thread once the wraps are snug on the needle. The steps above follow DMC and the RSN, which say to keep the thread taut until the knot is finished. Either way works; just pick one way and keep it the same so your knots match.
If you stitch with your left hand
Our diagrams are drawn for right-handers. Needle 'n Thread gives left-hand directions for two of these stitches: work split stitch from right to left, and work stem stitch from right to left with the thread kept above the line. Don't simply mirror the stem stitch diagram: a mirror image gives outline stitch instead. For the other stitches, many people just work in the opposite direction, but embroidery author Yvette Stanton, who stitches with her left hand, points out that reversing right-hand instructions works for some stitches and not for others. Check each finished stitch against the diagram.
Part 5: Your First Project: A Six-Stitch Sampler
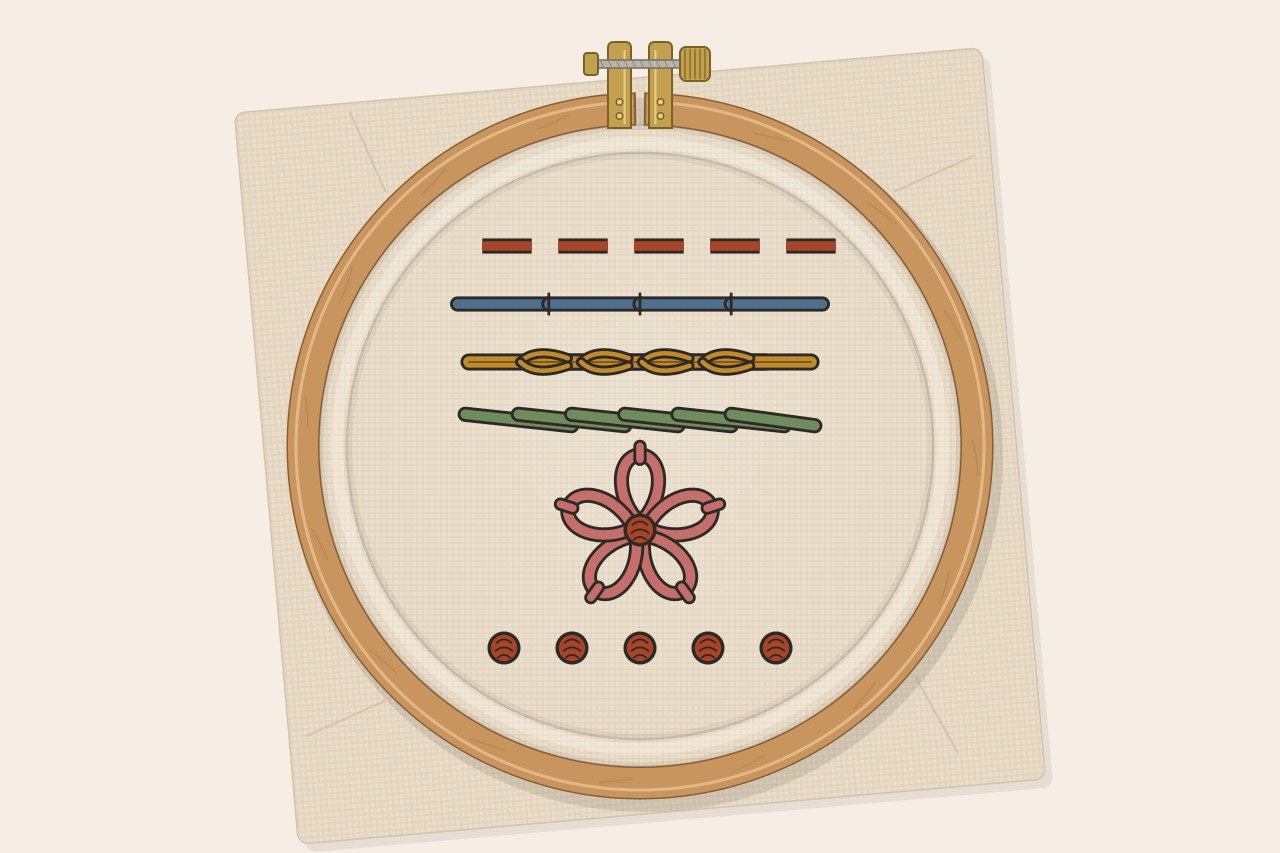
A sampler is a practice piece with one row of each stitch. This one fits a 6 in (15 cm) hoop: four lines 2 1/2 in (6.5 cm) long, about 1/2 in (1.3 cm) apart, then a small lazy daisy flower and a row of five French knots.
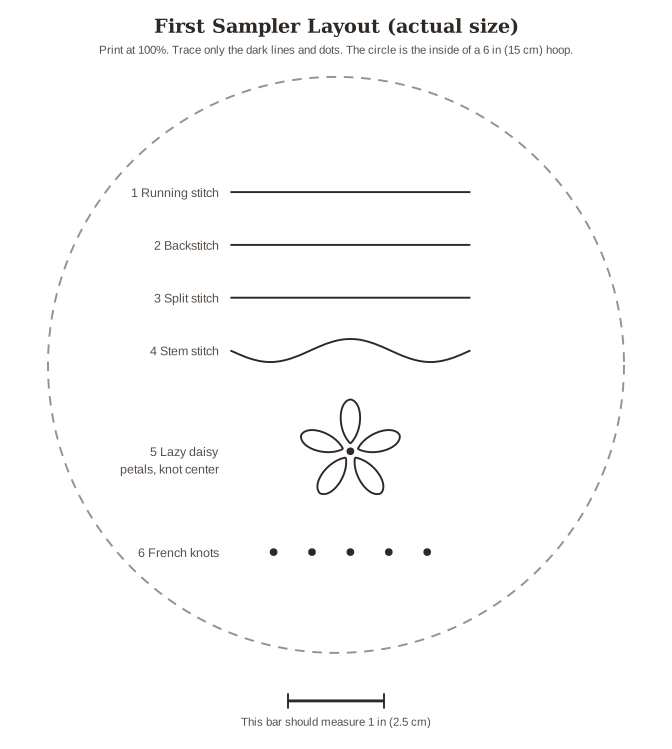
Print the layout: download the sampler layout (PDF, actual size). Print it at 100% or "Actual size", not "Fit to page".
You'll need
- The supplies from Part 1
- A 10 in (25 cm) square of cotton or linen
- 2 or 3 colors of floss
- The layout above, printed at 100%
Instructions
- Print the layout. Check that the scale bar measures 1 in (2.5 cm); if it doesn't, the print was resized.
- Tape it to a window or light box and tape the fabric on top, centered. Trace the four lines, the flower and the five dots with a water-soluble pen or a light pencil line. Don't trace the circle or the labels.
- Put the fabric in the hoop, drum-tight, with the design in the middle.
- Cut 18 in (45 cm) of floss, separate 2 strands and thread the needle. Start with a waste knot or a small knot on the back.
- Stitch from the top down: running stitch, backstitch, split stitch, then stem stitch along the wavy line.
- For the flower, make five lazy daisy petals, starting each one at the center. Fill the center with a French knot.
- Make a French knot on each of the five dots.
- End each thread on the back as you go. Change color for each row if you like.
- Rinse out any pen lines (see Part 7), let it dry and press it.
Next: a real pattern
Once the sampler is done, the Free Heart Stitch Sampler by Craft with Cartwright is a good next step. It's free with no signup, and five of its seven stitches are the ones you've just learned. It adds chain stitch, which is lazy daisies linked in a row, and cable stitch. It's designed for a 7 in (18 cm) hoop, a size up from the one in Part 1, so you'll need a piece of fabric about 11 in (28 cm) square. The PDF is set up for A4 paper, and the designer notes that changing the paper size changes the pattern's scale, so print it on A4 at 100% (actual size). Find it in our embroidery patterns.
Part 6: Common Problems
Why is my fabric puckering?
A common problem is fabric that gathers around the stitches. Usually the fabric wasn't drum-tight, or the stitches were pulled too hard. Tighten the hoop, then pull each stitch only until it lies flat. Stretchy fabric puckers too, and so do very short stitches made with lots of strands: Needle 'n Thread suggests longer stitches if you use more strands.
Why does my thread keep tangling?
Floss twists a little with every stitch. Every so often, let the needle hang down from the work so the thread untwists. Keep lengths to 18 in (45 cm) or less, and separate strands one at a time as described in Part 2.
Why does my fabric keep going loose in the hoop?
The fabric relaxes as you work. Tighten the screw again whenever it stops sounding like a drum. If it keeps slipping, DMC suggests wrapping the inner ring in bias tape [UK: bias binding] so it grips better.
Why is there a knot on the front?
There are a few possible reasons:
- It's a waste knot. That's on purpose. Snip it off once your stitches have covered the thread on the back.
- The working thread knotted itself. That's twisting. Let the needle hang to untwist it, and stop to ease out a loop before you pull it tight.
- A French knot came out loopy or loose. The thread wasn't held taut while the needle went through. Keep the tension on until the needle is all the way through.
Why did my French knot disappear to the back?
The needle went down the same hole it came up through, so the knot was pulled through with it. Go down very close to it, but not in it.
Why can I still see the pen lines?
Water-soluble marks go when the fabric is rinsed in water, so rinse it under cold running water as described in Part 7. Heat-erasable pen lines can come back when the fabric gets cold, and can leave a faint ghost line. If you used one, the line may not fully go. Keep pencil lines thin so your stitches cover them.
Part 7: Washing and Displaying
Washing
You'll need to wash the piece if you used a water-soluble pen, or if it got grubby. DMC's floss is colorfast, but check what your fabric can take first.
- Rinse the piece under cold running water. For a proper wash, use a small amount of gentle, non-biological detergent [UK: non-bio] and wash by hand.
- Rinse several times in cold water until the water runs clear. If the rinse water turns colored, stop washing.
- Roll the piece in a towel to take out the water. Don't wring it.
- Let it dry until it's just damp.
- Press it face down between towels, with a warm iron, never hot.
Don't use bleach or harsh detergents, and don't dry-clean it.
Displaying it in the hoop
A hoop makes a simple frame, and DMC notes that its hoops can be used to display finished work. Put the clean, pressed piece back in the hoop, drum-tight, centered and straight, with the screw at the top: you can hang the hoop from a loop of ribbon tied through the screw. To tidy the back, trim the spare fabric to a circle at least 1 in (2.5 cm) bigger than the hoop all round. Sew a big running stitch around it with strong thread, pull the thread to gather the fabric in behind the hoop, and secure the ends. For a neater finish, cut a felt circle the size of the inner ring and stitch it over the gathers. Sarah Homfray shows every step in this video:
Part 8: Where to Go Next
Once your sampler is done, here's what to learn next, roughly in order:
- Make the Free Heart Stitch Sampler (Part 5). You'll need a 7 in (18 cm) hoop.
- Learn satin stitch. It fills a shape with smooth stitches laid side by side. DMC works it over a split-stitch outline, which you already know. Needle 'n Thread says it's smoothest with 1 strand. The DIY Monogram Embroidery Hoop by Stevie Storck uses split stitch and satin stitch on a 4 in hoop.
- Try a small design with color. The Flower Ring Frame by Floss Field uses a 6 in (15 cm) hoop, stem stitch, satin stitch, French knots and one new stitch, fishbone.
- Try a bigger sampler. The Embroidery Sampler Pattern (10 stitches) by Crewel Ghoul uses a 5 in hoop and adds chain, fly, buttonhole, satin and fishbone stitches.
- Browse our embroidery patterns. All four patterns above are free with no signup. Check each card's skill list before you start, and pick one with skills you have, or one new stitch you'd like to learn.
Try a yarn craft next: Crochet for Absolute Beginners and How to Start Knitting both take you from the first stitch to a finished dishcloth.